by Gordon Macdonald •
Although lure fishing is extremely popular and productive these days, there is no denying the effectiveness of bait for a variety of saltwater piscators. Quality fresh baits are one of the major factors in quality captures and presentation of this bait is just as important. If the bait is fresh and looks natural then there is a heightened chance that a quality fish will find it appealing enough to eat. Good hook placement and bait coverage will almost guarantee a hook-up when all factors are combined.
When chasing larger predators, anglers fish with numerous types of bait including whitebait, hardyheads, garfish, pilchards, whole squid, mullet, herring, banana prawns and a variety of fillet baits. Longer baits such as these require at least two hooks to present well. The front (leading) hook is placed through the nose or top of the bait and takes the weight of the bait as it is towed or drifted through the water column.
The rear (bottom) hook is the one most likely to penetrate the fish as it is placed in the tail of the bait where most strikes come from. Subsequent hooks between these two offer good hook coverage of the bait to maximise hooking potential if the fish grabs the bait side-on instead of from the tail or head. Baitfish, fillet baits and squid come in an array of sizes and often you don’t know what size baits you are going to secure until you are out on the water.
Additionally, even store-bought baits such as garfish, squid and pilchards will often have different sizes in one pack. For the angler, this can be frustrating, as you will need to constantly change rigs to present each bait size effectively. Although standard snelled hook rigs are ideal and not time-consuming to make, you will still need to re-rig each time a different-sized bait is put into play. Additionally these rigs need to be made once you are on the water and know what sized baits you’re using.
A better option is the sliding snell rig. With this rig, all hooks except the rear hook can be moved up and down the leader to accommodate baits of any size. This can optimize bait presentation and hooking potential by allowing you to have all hooks in the exact position that you wish, no matter what size bait you are using. You won’t need to make the bait suit the rig and instead the rig will suit the bait.
These rigs are easy to make and can be prepared at home well ahead of your trip, as they can be adjusted to suit any type of bait you catch or purchase. They can be made with all kinds of leader and hook sizes and having an assortment prepared and stored for use can maximise your time on the water. Let’s look at how easy they are to make.
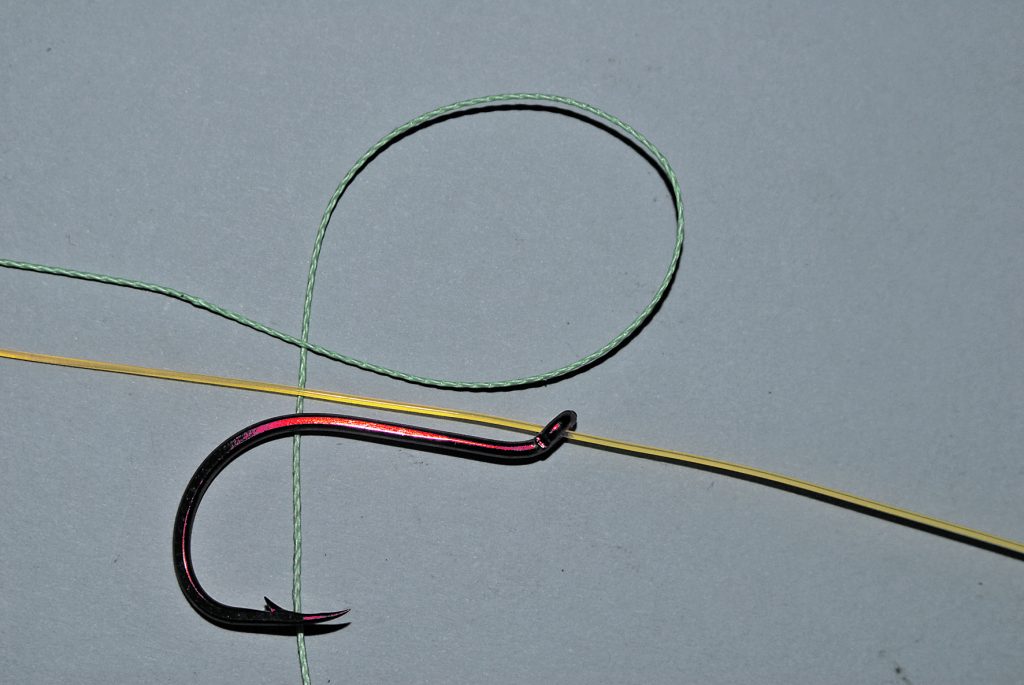
Step 1.
To make your sliding snell rig you will need some leader material of your desired size, some 30-80lb braided line or waxed thread, your chosen hooks (preferably patterns with turned out eyes), a pair of scissors and a swivel for the top of your leader. These are brightly coloured for the sake of clear visual demonstration.

Step 2.
To attach the bottom hook to the leader, use a snell, as this places virtually no stress on the leader. If you use a blood knot then ensure you lubricate the knot and pull it tight slowly to eliminate stress and friction on the leader. Additionally, this rear hook could be crimped on when using heavy leader. To snell, first pass the end of the leader through the hook eye.

Step 3.
Holding the tag end against the hook shank, fold the main portion of leader back and begin wrapping around the hook shank. Wrap it 6-8 times around the shank.

Step 4.
Pass the main portion of leader back up through the hook eye and pull taught.

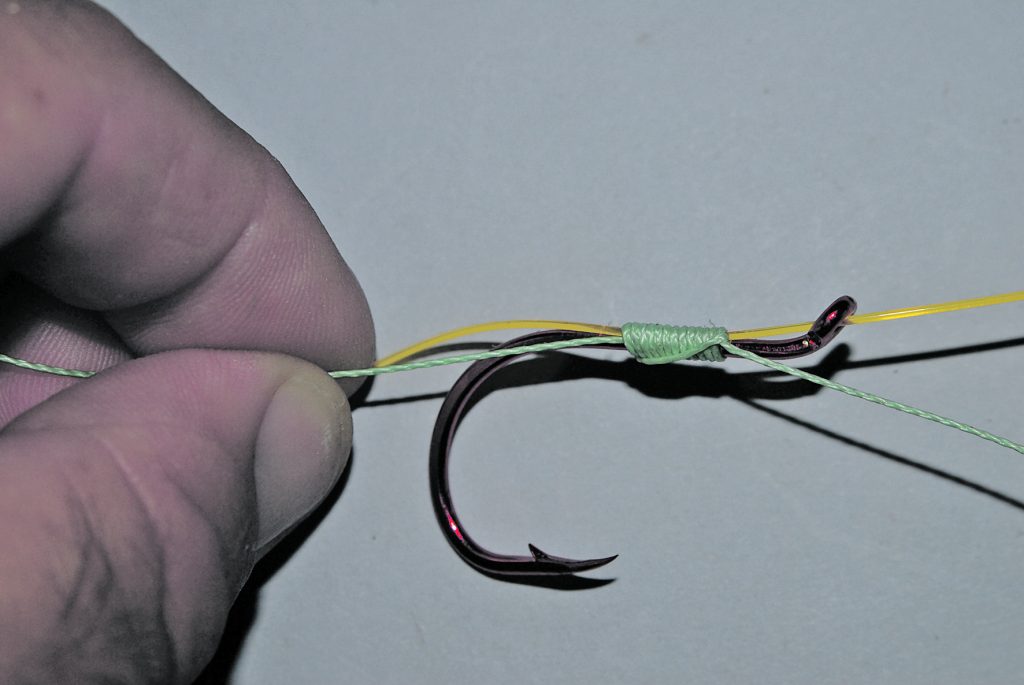
Step 5.
Pass the main leader through the eye of the second hook. Get your braid, make an overhand loop as shown and then lay the leader and hook alongside and on top of the tag of braid.
Step 6.
Take the tag end of the braid and begin wrapping it around the hook shank, the leader and rear facing portion of braid all together.

Step 7.
Continue wrapping until you have between ten and fifteen wraps of the braid on the hook shank, leader and tag of braid.

Step 8.
Pull on both ends of the braid very tightly to compact and lock the knot and provide good grip on the leader.
Step 9.
This is how a standard leader will look once finished. The rear hook is secured in place and the front hook can be slid along the leader until it is in the correct position to best present your bait. Even if the fish only grabbed the top hook, it will slid down and secure against the rear hook to provide maximum hook setting potential on the strike. Once a swivel is added to the top of the leader, you are ready to go.

Step 10.
Rigs made with leaders of different breaking strains and types (monofilament and fluorocarbon), sporting hooks of any size can be prepared at home to support various sizes of baits used to target numerous species. These can be stored in clip seal bags or a leader wallet until ready for use. Prepare a few sliding snell rigs before your next trip to simplify your fishing.