by Gordon Macdonald •
During the cooler months, huge conglomerations of baitfish swarm along out beaches and into the estuarine systems.
The abundance of species such as whitebait, herring, hardiheads, frogmouths, garfish and numerous other pilchards and sprats are one of the main reasons why many larger fish species choose this period of the year to breed within the inshore waters. Tailor in particular, are ravenous predators which will attack a broad array of baitfish species, a fact that isn’t missed by keen anglers, including fly fishers. This month’s pattern is a handy one to have at your disposal for targeting tailor and other species during all months of the year. The Skull Bait is a fairly durable pattern which has accounted for longtail tuna, mack tuna, trevally, tailor, school mackerel, bonito, spotted mackerel and many other prime sportfish.
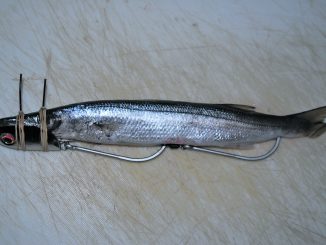
In my opinion, one of the main attributes that a baitfish pattern should exhibit is flash and a prominent eye, as these are both key catalysts in a predatory strike. The Skullbait has both of these and is a very realistic pattern in the water. The head is slightly weighted and this allows the pattern to sink head first between strips. This erratic and almost darting action is common for a distressed or startled baitfish. Additionally, this pattern can be sunk down below a baitfish school where larger predators are often lurking, as they clean up the scraps left by the mayhem above. Within Moreton Bay, large snapper will also commonly follow and feed below schools of tuna and mackerel. Even as it sinks, the Skullbait looks realistic and therefore strikes are often forthcoming during this stage of your retrieve, so be ready to strip strike at any time.
MATERIALS
The materials list for the Skullbait is not that extensive and should be easy to source at any good fly materials outlet. There are also substitutes that could be used in place of many of the materials. For the head we have used Fish Skulls which are available in around half a dozen finishes with four sizes in each. Each packet comes with adhesive 3D eyes to suit the relative head size. There is a guide on the Fish Skull’s packet to tell you which size is best suited to a particular range of hook sizes. I have used the silver version for this pattern as the reflective chrome head really gives off some flash in the water and is not too contrasting with the remaining materials.
The main body and tail of the Skullbait is DNA Holo Fusion, which is a blend of Mylar Flash and synthetic fibres. Over this we have put Mylar tubing. This adds extra flash and an almost scale-like appearance, however its main job is to hold and control the Holo Fusion to stop it matting with the hook point during casting. To increase durability we have coated it with Soft Dip. A little red Krystal Flash is added under the chin to mimic flared gills. You can also leave a few longer fibres to make it appear as if the Skullbait is bleeding from the gills, an ideal effect when dredging this fly around bait schools. Other materials that could replace the DNA Holo Fusion include Slinky Fibre, Ghost Fibre, Streamer Hair and Sparkleflash. For the flared gill represented by the Krystal Flash, we could substitute Hivis, Fluorofibre, Shimmerflash or Sparkleflash. This pattern can be tied in numerous colours and sizes with contrasting belly and back if desirable, depending on the baitfish in your particular neck of the woods. I mainly use grey, Seafoam green, white or tan combinations.
RETRIEVE TO DECEIVE
Like most baitfish patterns, there are several retrieves that can be used to get the best effect and most strikes whilst using the Skullbait. The most suitable retrieve can be dictated by the movements of the baitfish in the area. When a bait school is being set upon by pelagics smashing and slashing their way to gluttony, you are best to tuck your rod under your arm and strip like crazy using both arms. Once the mayhem subsides, I will generally cast the Skullbait out (on an intermediate line), allow it to sink and then begin a slow hand-over-hand retrieve which has this pattern imitating a wounded baitfish. For generally prospect casting, a series of short sharp strips and intermittent pauses will generally work on most species. Be willing to mix it up a bit on any given day until you find the retrieve that gets the most attention for the Skullbait.
MATERIALS
HOOK: Mustad S74SZ 1/0; THREAD: Fine Mono; UNDERBODY: Grey Holo Fusion; BACK: Iron blue Holo Fusion; OVERBODY: Medium pearl Mylar tube; OVERCOAT: Soft Dip; GILL: Red Krystal Flash; HEAD: Medium silver Fish Skull; FINISH: Soft Dip.
TYING
Step 1.
Place your hook securely in your vice and attach your thread with a jamb knot, just behind the hook eye. Cut a small portion of the grey Holo Fusion, which is at least twice as long as the entire hook. Tie this in under the hook shank just behind the hook eye.

Step 2.
Cut another portion of the grey Holo Fusion which is the same length as the first yet around three times the volume. Tie this in at the same point yet on top of the hook shank.

Step 3.
Cut a portion of iron blue Holo Fusion which is around two thirds the volume of the last grey tie. Secure with a series of thread wraps at the same point as the last tie so that it is sitting on top of it. Do a whip finish but do not cut away the remaining thread.

Step 4.
Cut a piece of Mylar tube which is approximately as long as the hook. Remove the cotton inner core and then pass the end over the eye of the hook. Use several light thread wraps to position and start tying down the Mylar tube and then firmer wraps to secure it. Whip finish and cut away the remaining thread.

Step 5.
Invert, or roll the Mylar tubing inside out and back over itself. You may need to fray the end a little so that it passes around the hook. Attach your thread just behind the hook again. Cut a short portion of Krystal Flash and tie this in just under the shank, adjacent to the hook eye. Whip finish and remove the remaining thread. Coat the Mylar tubing with soft dip, right down to where it begins to fray.

Step 6.
Once the soft dip has dried, cut away the rear portion of the Mylar tubing, just behind the hook point. Use the tips of your scissors for this and be careful not to accidentally cut any of the Holo Fusion fibres.

Step 7.
Mix up a small amount of 5-minute Devcon epoxy and put a little around the Mylar tubing adjacent the hook eye. Put your Fish Skull on so that the slightly flatter side of the head us facing upwards. Hold in place until it dries and then attach the adhesive eyes that are supplied with the Fish Skulls to the eye recesses. A little more epoxy added over these eyes will make them more durable.
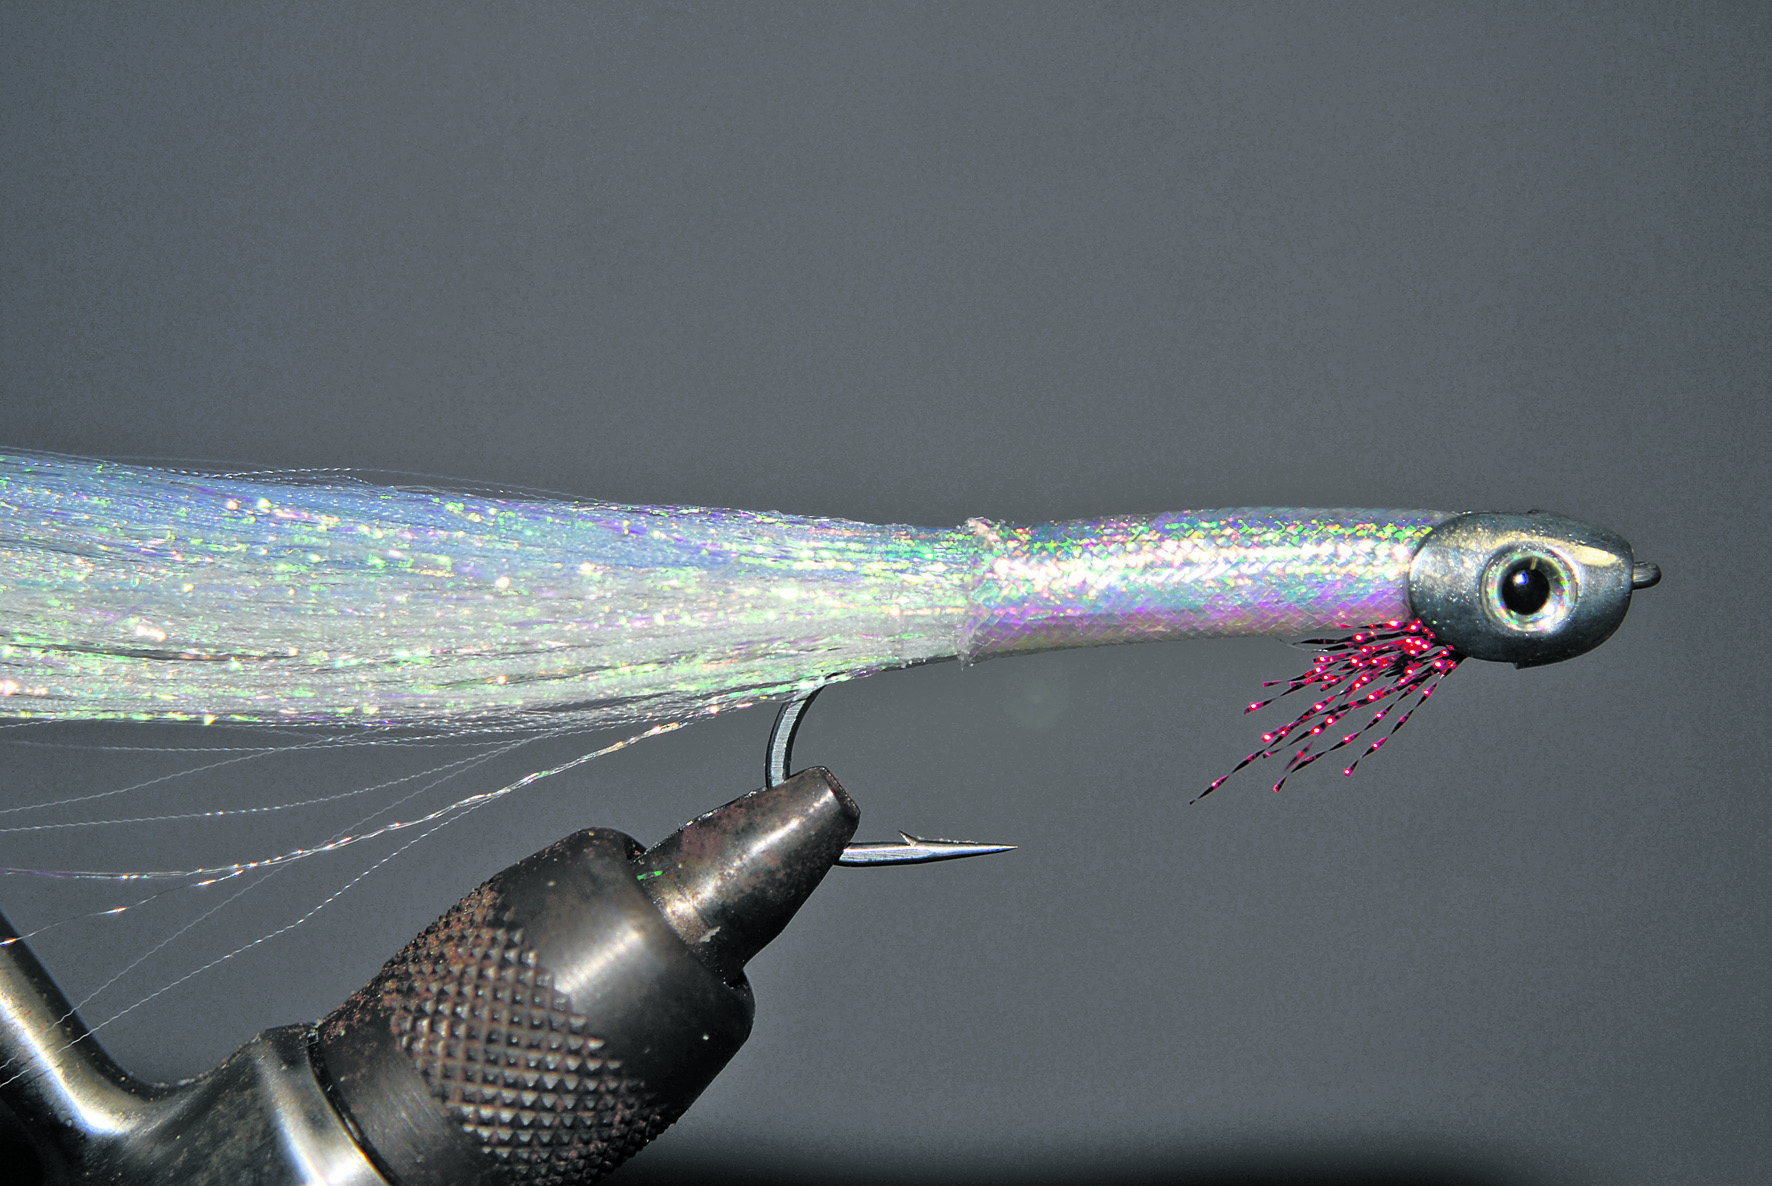
Step 8.
Trim the red Krystal Flash if necessary and then shape the Holo Fusion into a tapered tail. Apply another coat of soft dip over the Mylar tubing and back a few millimeters behind it. Once dried, your Skullbait is now ready to tempt a broad array of saltwater assailants.